
Using an Instructional Cycle to Comprehensively Teach Students to Utilize their Assistive Technology
- Oct 23, 2016
- 6 min read
The Sandwich Instructional Cycle (SIC)

The Sandwich Instructional Cycle (SIC) is a five-step instructional sequence that can be used to frame teaching with instructional technology as Assistive Technology (AT). The ultimate goal of the SIC is to help teachers develop a thought philosophy for how we implement effective learning experiences for our students using AT. The AT evaluations summarized in this article provide IEP teams with the foundation necessary for step one of the SIC; it is the four additional steps that are needed for AT to be a sustainable and effective tool for our students. Lastly, any educator can use this instructional cycle in any service model configuration, whether it is special education, a related service, an itinerant objective, or general education in order to implement a systematic approach to instruction of and with iPads, Chromebooks, Laptops, etc., as AT.
Overview of the Sandwich Instructional Model (SIC)
The SIC uses a sandwich-building metaphor for the five-step instructional cycle that is needed for effective AT use and implementation. The goal of this instructional cycle is to combine effective teaching strategies in these necessary steps, i.e. What are the systematic, explicit steps needed for student success??

Step 1. Introduction and Rationale. The first step is a preparatory one; before making the sandwich, we have to decide on the ingredients we will need and be aware of the environment our sandwich will be eaten in and any dietary or allergy restrictions. Also, it is helpful to have on hand the wise lessons learned from failed sandwiches in the past, such as the fact that soggy bread may not be desirable, so it might be best to toast the bread before adding the ingredients. Once the ingredients are planned and collected, and the sandwich’s purpose has been determined, it is time to begin the process of making the sandwich. So, the sandwich is using the iPad as AT. The ingredients are the student and his specific needs, the IEP team, AT evaluations, resources and accessories, such as the SETT (2006), WATI (2004) and QIAT (2010), the curriculum, and, of course, the iPad. The environments where the sandwich will be eaten are, at minimum, the classroom, the library, and the student’s home.
The first step requires the teacher to introduce new technology or software related to the iPad that will be used, why it will be beneficial, and to insert this lesson in a meaningful context for the learner, i.e. the setting for the sandwich is important. Typically, in many one-to-one iPad or laptop district-wide programs, the tool may be chosen without considering the student’s educational needs. Students served by special education have needs that must be evaluated prior to device acquisition. Teachers should not hesitate to evaluate student’s AT needs and determine whether a better AT tool is warranted and advocate for an AT device/solution that is not the iPad.

Step 2. Model. The next step in the cycle is model with verbal description. Here, teachers might imagine they are the bread holding the entire learning activity together. In step two, teachers model how the new technology skill will be used for learning, including metacognitive think-alouds, to help students learn about brain processes (e.g., “I would like to look up the address to the restaurant I am going to later. I think my best bet is to do a search on Safari. After I find the restaurant address, I can copy and paste the address into my Maps app to create walking directions to get there on foot”).
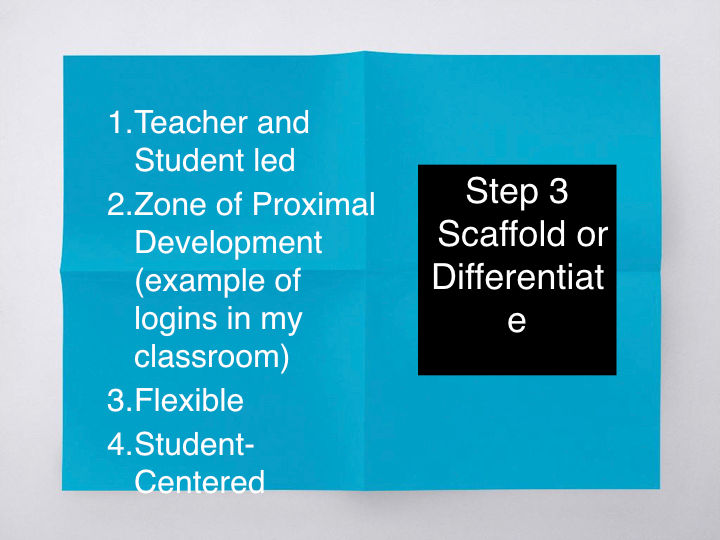
Step 3. Scaffold or Differentiate. AT, as the tool, represents the ingredients in the middle of the sandwich, with additional ingredients, like condiments, representing needed scaffolding or differentiation. The long-term goal is for students to become independent and proficient using their technology and, ultimately, at the level appropriate for our student, this will be realized, but only with systematic and explicit instruction on the part of the teacher. In step three, teachers assemble the ingredients for the sandwich in a precise order, incorporating all the special dietary needs already noted in our plan. Some of these dietary needs represent the instructive needs of the special education student: Scaffolding can be defined as supports that are put in place that can be removed as a student becomes move proficient. An example of scaffolding is providing resource sheets with an AT device, such as a brailled VoiceOver command resource for a student learning how to use the iPad screen reader.
Differentiation can be defined as supports put in place that are integral and needed for a student unique to his/her individualized needs. Additionally, there is a data driven component to differentiation where we have our "lab coat" on and teachers are actively progress monitoring student growth to ensure we have the right tools and strategic instruction. These may be long-term needs, such as text-based resources at the independent reading level or translated resources in a student’s native language to ensure understanding. An example of differentiation may be providing text-based resources at the grade level needed by a student with learning differences.
The Universal Design for Learning (UDL) principles provide a framework for identifying the student learning needs associated with step three. The UDL principles are: (1) Provide multiple means of representation (2) Provide multiple means of expression and (3) Provide multiple means of engagement (Rose & Meyer, 2000). Within UDL, The Zone of Proximal Development (Vgtosky, 1978, See Resource Here) is a primary consideration for step three’s scaffolding and differentiation. The Zone of Proximal Development refers to what a student can do with little or no assistance. In this step, independent work needs to be situated so students can grow or demonstrate their learning instead of struggle when faced with a task to do on their own that is too challenging. Additionally, educators can use a task analysis to determine needed steps that will create further AT independence.

Step 4. Independent Practice, Homework and Collaboration. Educators might ask, “Is my student experiencing success using her iPad as AT and growing her knowledge?” As teachers, when we plan supportive, explicit instruction our students will be more successful. A feature of step four is that the teacher cannot grab the sandwich at this point. The sandwich is being enjoyed by our student, and it will spoil the experience if we grab it out of his hands to teach him how to bite into it. This piece of the metaphor emphasizes the importance of being patient and hands-off when our student is practicing independently. When something goes wrong with his or her technology and we grab it to “fix” the problem quickly, we are sending the message that the student could not possibly fix the problem on his own. One additional element in this step is that teachers should only send students away with independent work on AT that actually can be done independently. Step three, where teachers differentiate or scaffold AT use, will reveal the resources or aids the student needs in order to complete activities independently. Lastly, this step includes teachers spreading the reach of AT by collaborating with other team members and ensuring AT skills and procedures can be used throughout a student’s program. An example of collaboration, once a student is using text-to-speech proficiently, would be working with each team member to ensure the student has access to digital documents used in each class. This is another place where the instructional cycle often falls apart and can create AT abandonment. Some simple strategies to ensure effective collaboration to promote AT are:
Offer timelines to team members that create a system for when digital materials are needed each week and made available to a student.
Create a Google Drive folder system for easy back-and-forth with digital materials, where team members can share documents without having to use e-mail or flash drives.
Use a 5% to 95% ratio for technology troubleshooting-to-learning as an AT rule of thumb. If a team member is having trouble obtaining or using a document or materials with AT, then try a new solution after 5% of the time has been spent attempting to get the first attempt to work. In the end, 95% of the time should be spent learning, not troubleshooting technology. For example, if a document is not scanning correctly, move forward with the learning activity using another method, i.e. dictating the text into a digital document with your student or retyping it. In a 60 minute resource classroom setting, the 5% to 95% ratio would mean that 57 minutes are spent on the learning activity and 3 minutes are spent troubleshooting technology when needed. Some other ways this may be achieved include having a student work on another learning activity while troubleshooting, so resource time is productive and engaging.

Step 5. Monitor and Maintain. In step five, the teacher is the top layer of bread on our sandwich. The teacher is the final piece of bread, regardless of student independence or dependence. Teachers must always remember that we are the top and bottom pieces of bread supporting our students’ learning. This fifth step in the cycle is monitoring and maintaining. This final step is often forgotten about and can be the reason AT solutions are abandoned and ineffective. In this step, teachers can collect weekly or bimonthly data related to AT use to check for effectiveness and student proficiency. Additionally, in this step, teachers must collaborate with other team members to ensure AT is being implemented across the school day and continually check for any troubleshooting issues that will arise for students using AT. We cannot operate in a vacuum! It is easy to get tunneled visioned in our classrooms and not reach out to talk with our team members, teachers & parents, and share the AT plans, progress and supports.


Comments